Showing posts with label Recipe. Show all posts

Wednesday, March 7, 2012

Pork Chop Rub Recipe - to die for! And Winner!


We've had some pressing family matters going on around here so it's put crafting, sewing and blogging on the back burner. I'm dying to sew a few projects up but it will wait. I do want to share a quick and easy rub for pork chops that I tried this week and it turned out awesome! Love, love, love!

Excuse the bad photo - I snapped it with my phone. Obviously!


I found this on the Betty Crocker app on my phone when I was trying to figure out what to make with these pork chops.

Spicy Rub

1 tablespoon chili powder
1 teaspoon ground cumin
1/4 teaspoon ground red pepper (cayenne)
1/4 teaspoon salt
1 large clove garlic, finely chopped
8 pork loin or rib chops

In a small bowl, mix together all ingredients except for the pork chops. Rub the seasoning mixture on both sides of the pork. Refrigerate for at least an hour to let the flavors blend. Grill as usual and enjoy!


I also finally did the drawing for the giveaway! So excited that The Northern Cottage is the winner! Yay! E-mail me your mailing info and I'll drop these in the mail to you (sarah.jarnagin at yahoo dot com)! I hope you and your daughter enjoy them!


Tuesday, December 13, 2011

Pinterest Love

Source

Are you addicted to Pinterest? Don't know what Pinterest is? Read here. If you want an invite, let me know!

I've tried many crafts and recipes that I've found via Pinterest and had great successes! I have several friends who have had failures as well. Mostly, mine have turned out great!

After a trip to the thrift store last week, I turned this sweater into these leg warmers aka boot socks! All for a $1 sweater.


I cut the arms off using the stripes as a guide. I hemmed them quickly to create the legwarmers which double as faux boot socks!


I also made this tie turned necklace using one of my dad's old ties. Thrift stores normally carry ties for only $1 so this can be a cheap craft. I used unfinished wooden balls from the craft store - when they were on sale 30% off so that helped too.


I have a board of recipes that I've tried and love! This week I made this potato soup and it was soooo awesome! We added in crumbled bacon (I think ham would be great too) and then added shredded cheese to our bowls of soup. So yummy and EASY!

Saturday, March 26, 2011

Chocolate Cupcakes with Fluffy Peanut Butter Frosting ~ Yum~


Tidy Mom has some amazing cupcakes on her site! I love to drool over them so when I was searching for a recipe for a dessert for a benefit dinner, I ran to her site to search through her archives! It was so hard to pick but I was looking for something I could make with ingredients I had on hand so I came up with these! 

The frosting is DIVINE! Fluffy and rich! I will say that the chocolate base needs to be rich. I did a fudge chocolate using her technique (homemade tasting using box cake mix) and it was not rich enough to go with the frosting. Go rich or go HOME! :)


Friday, March 25, 2011

Sloppy Joes

I thought you all might be interested in my go-to sloppy joe recipe... I've been using it for about a year or so.  Tonight, we ate it with potato wedges and carrot sticks. Cayson had two servings of everything which is crazy for him at dinnertime! 

Saturday, March 12, 2011

New Recipe! Creamy Pasta & Sausage


I tried out another new dish last night that turned out delicious! Everyone in our house enjoyed it and the ingredients are so simple! Dusty did think it tasted similar to the Creamy Mexican Skillet but I informed him that the ingredients were completely different. It made a lot! I mean, it uses an entire box of pasta. It was great for lunch today too!

Creamy Pasta and Sausage

1 lb sausage, casings removed (I used hot sausage because that's what we had)
4 cups dry penne rigate pasta
2-3 cloves garlic, minced
28 oz. can Italian tomatoes, chopped, drained
1 1/2 cups half & half
1/8 teaspoon red pepper flakes (optional)
salt & pepper, to taste
fresh grated Parmesan cheese (sprinkled on top)

Directions
Brown sausage in a large skillet over medium heat. Stir in the garlic during the last minute. Meanwhile, cook the pasta according to the directions on the box. Drain the pasta and set aside.

Turn the heat down to medium-low and add the tomatoes, half & half, red pepper flakes, and salt & pepper to the skillet. Add the pasta and stir until thoroughly mixed and heated through.

Top with grated Parmesan cheese and serve. 


Monday, March 7, 2011

Creamy Mexican Skillet

I've been meaning to share this recipe with some of my friends so I thought I would share it with all of you too! I don't have any pictures to share but I promise it is wonderful!

Creamy Mexican Skillet

Ingredients: 

1 pound ground beef
1/2 bell pepper, chopped
1/4 cup onion, chopped
1/2 t chili powder
1/2 t garlic powder
1/2 t salt
4 oz. cream cheese
1/2 cup sour cream
1 cup salsa
1/2- 1 lb pasta (I used whole wheat Rotini) 

Directions: 

Brow ground beef in a skillet with onion, bell pepper and seasonings. Drain grease. Stir in cream cheese, sour cream and salsa. Stir until cream cheese is melted. Add cooked pasta to skillet and stir to coat. 

Enjoy! Enjoy! Enjoy!

Tuesday, February 22, 2011

A Handmade Gift: Taco Seasoning

IMG_7944

Did you know you can make your own taco seasoning at home using the spices you already have? Seriously! For several years, I’ve just seasoned my beef with paprika, cumin & chili powder instead of purchasing the salty packets.

Last year, I ran across a recipe to mix up your own taco seasoning mixture from Annie’s Eats. I just now got around to mixing up a jar of it! I thought it would make a perfect “just because” gift or a teacher gift. I mixed mine up in a Kerr jar and attached a tag with the instructions for use.

IMG_7947

Homemade Taco Seasoning

4 T chili powder
3 T plus 1 t paprika
3 T ground cumin
1 T plus 2 t onion powder
1 t garlic powder
1/4 t cayenne pepper

Combine all ingredients in a bowl or jar. Mix or shake well to combine. Store in an airtight container.

To make your taco filling, use 2 heaping tablespoons in the place of a taco seasoning packet. Add seasoning to 1 lb beef or chicken and 1 cup of water. Simmer until most of the liquid is gone.

Saturday, October 2, 2010

Spicy Chicken Mac & Cheese

I tried a new recipe this week for a mac & cheese that sounded like it might be similar to Hard Rock’s Twisted Mac, Chicken & Cheese – which I LOVE! Turns out, with a few alterations this was almost identical as I remember it tasting except for the tortilla chip topping.

Spicy Chicken Mac & Cheese

1-2 chicken breasts
2 cups dry pasta (macaroni or similar)
1 cup shredded mild cheddar cheese
1 cup shredded sharp cheddar cheese
2 cups Pepper Jack cheese, divided
1 can (12 oz) evaporated milk
1/2 tsp ground black pepper
1 cup broken tortilla chips
1/4- 1/2 tsp crushed red pepper flakes

Preheat oven to 350. Lightly grease 2 1/2 quart casserole dish.

Coat chicken breasts in Teriyaki sauce and grill until cooked through. Let chicken rest for 5 minutes before slicing.

Cook pasta according to box directions. Drain pasta and return to saucepan.

Add cheddar cheeses and 1 1/2 cup Pepper Jack cheese, evaporated milk, chicken and pepper to pasta. Stir until combined. Pour into prepared casserole dish. Combine remaining Pepper Jack Cheese, tortilla chips & red pepper in a bowl. Sprinkle over the top of dish. Cover tightly with foil. Bake for 20 minutes. Uncover and bake for an additional 10 minutes or until lightly browned.

Adapted from Carnation recipe for Pepper Jack Cheesy Mac

Thursday, July 1, 2010

Recipe: Miniature Lemon Cheesecakes

IMG_7391

I posted the Miniature Lemon Cheesecake recipe here. Check it out!

Monday, June 15, 2009

Can’t go wrong with Peanut Butter & Chocolate!

peanutbutter pie 

Photo courtesy of Pioneer Woman

I made this pie last week to take to some friends. My friends told me it was delicious… hope they were telling the truth. I did lick the bowl …. oops! It was yummy!

This was an easy recipe that is pretty much fail-proof! A great summer dessert!

Friday, April 3, 2009

Friday Favorite: Martha + Key Lime Bars Recipe

My mom bought me Martha Stewart’s Cookies cookbook for Christmas this year. I Love this book with a capital L. I wasn’t crazy about the 1st recipe I tried (Chocolate Sugar Cookies), but I just love to flip through the book looking at all the yummy recipes. So many to choose from!!!marthastewartcookies

I may have mentioned that I made Key lime bars for our church dessert auction. I love Key lime – one of my favorites is Cheesecake Factory’s Key Lime Cheesecake. Oh, yum! Heaven by the slice!

This recipe is pretty straight forward and simple – except for squeezing 23 key limes. That was a bit time consuming, but worth it in the end.
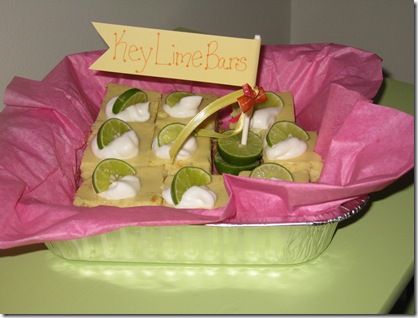
IMG_4753

Key Lime Bars

Ingredients
For the Crust:

1 cup plus 2 1/2 tablespoons finely ground graham cracker crumbs
1/3 cup sugar
5 tablespoons unsalted butter, melted

For the Filling:

3 large egg yolks
1 1/2 teaspoons finely grated lime zest
1 (14 oz) can sweetened condensed milk (like Eagle Brand)
2/3 cup fresh Key lime juice (about 23 key limes total)

For the Garnish:

1/4 cup heavy cream
2 Key limes, thinly sliced into half-moons

Directions

1. Preheat oven to 350. Make crust by stirring together the crust ingredients in a small bowl. Press evenly into the bottom of an 8” square glass baking dish. Bake until dry and golden brown, about ten minutes. Let cool completely on a wire rack.

2. Make filling: Put egg yolks and lime zest in the bowl of an electric mixer fitted with the whisk attachment. Mix on high speed until very thick, about 5 minutes. Reduce speed to medium. Add condensed milk in a slow, steady stream, mixing constantly. Raise speed to high; mix until thick, about 3 minutes. Reduce speed to low. Add lime juice; mix until just combined.

3. Spread filling evenly over crust using a spatula. Bake about 10 minutes or just until filling is set, rotating halfway through, Let cool completely on a wire rack. Refrigerate at least 4 hours or overnight.

4. Make garnish: cut into 2 inch squares. Put cream in clean bowl of an electric mixer fitted with the clean whisk attachment. Mix on medium-high speed until stiff peaks form. (I added some sugar here to make the whipped cream sweet.) Garnish bars with whipped cream and a slice of lime. Ungarnished bars can be refrigerated in an airtight container up to 3 days.
IMG_4720 IMG_4719

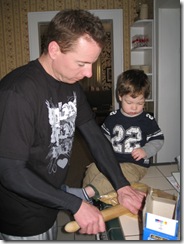
Here my guys are crushing the graham crackers for me. Such helpful guys I have!

My laptop is going to visit the Dr. today... I don't know when we'll be reunited but hopefully, it wlil be a happier computer. So, I'll be behind on my blog reading and commenting. Boo! Guess I'll get a lot done while it's gone...

Wednesday, March 11, 2009

Homemade Mexican Rice

I've come up with a homemade Mexican rice that works for us - I read how much sodium is in the box mixes and I nearly had a heart attack. Wow! The Ingredients- brown rice (or white rice), tomatoes (canned or fresh or Rotel), onion, garlic, jalapenos (mine are frozen from my summer garden), cumin, paprika, chili powder, cayenne pepper and olive oil.

Directions- Cook rice according to package. For this recipe, I use 1 cup rice and two cups water. Salt as desired.

I blend my tomatoes in the blender because I don't like chunky tomato. A can of Rotel works great but I was out of it this time. Chop 1/4 cup onion, 1 or 2 garlic cloves, and 1-2 jalapenos.


Heat olive oil in a skillet. Add garlic, onion and pepper. Saute for a few minutes to soften them up.

Pour tomatoes into skillet (If using canned - use about 3/4 of the can. For Rotel, use the whole can). Add 1 T each of chili powder, cumin & paprika and 1/2 t cayenne pepper. Stir and simmer for 10 minutes.
Stir mixture into rice. Taste and season as needed.

Hope this recipe works for you! I'm not good at measuring - I kind of throw it all in but I tried my best to guesstimate!

Tuesday, March 3, 2009

Chili & Cheddar Muffins

Sunday night’s dinner consisted of a new version of chili and cheddar muffins. I wanted to make a new chili that included different types of beans. This recipe makes a HUGE pot of chili. I froze half of it and the hubby & I still had left-overs! The muffins are great because they have the hint of cornbread flavor along with the cheddar. They are the perfect accompaniment for many entrees - especially soups! I think adding some garlic to the muffins would make them outstanding! I love garlic though!

Sarah’s 3 Bean Chili

2 lbs ground beef
1 onion, diced
½ bell pepper, diced (optional)
2 jalapenos, diced (optional)
1 packet chili seasoning
2 cans ranch style beans
1 can black beans, rinsed & drained
1 can chili beans
4 small cans tomato sauce
2 cans Rotel
4 T chili powder
1 T cayenne pepper (optional)
½ T garlic salt
salt & pepper to taste

Brown beef with onion and bell pepper. Drain all fat and return to pot. Mix in the remaining ingredients. Bring to a boil and simmer covered or put in the crock pot for the day. Yum-o!!!! It's great as leftovers - you can always make it way ahead of time!

Cheddar Muffins

1 ½ cups flour
½ cup cornmeal
1 T baking powder
½ t salt
pinch of ground red pepper
¼ cup (1/2 stick) butter, melted
1 cup milk
1 large egg
1 ¼ cup shredded cheddar cheese
Heat the oven to 425 degrees. Grease 12 muffin cups (do this thoroughly – I had some difficulties removing mine).
In a large bowl, with combine the dry ingredients.

Melt the butter and cool it slightly. Stir in the milk. Beat in the egg. Stir the liquid into the dry ingredients until moistened. Stir in 1 cup of cheese. Divide the batter into muffin pans and top each muffin with the remaining cheese.

Bake for 15-20 minutes. These were a wonderful accompaniment to the chili!!!

Monday, February 16, 2009

This & That

Last night, I decided to whip up some pancakes for dinner. Knowing I was out of Bisquick, I pulled out a recipe I clipped from the February issue of Family Circle. You can find the recipe here. It was a fairly easy process - I had all the ingredients except the allspice, so I left that out. These turned out okay. I think next time I will use buttermilk instead of milk.

On other news, I am a terrible blogger. Things have been crazy around here. I made a ton of sweets to share with friends and family and I plan on sharing the recipes with you. I've also had a sick boy - he's been sick off & on for 4+ weeks! I'm currently in the midst of a lot of projects. I'm having a hard time focusing on one thing... I jump from one thing to the next - never finishing a project. I'm driving myself crazy! I also have a few bargains to share - I went to Dollar General the other day to pick up some cocoa. I noticed their remaining Christmas was 90% off so I picked up a few things that I knew some spray paint and scrapbook paper could transform. Imagine my surprise and excitement when all the Christmas items rang up for a penny each!!! Yes, I got 6 items for .06! Crazy Awesome!

Friday, February 13, 2009

Peanut Butter Balls

Here's the recipe for everyone to make for their honeys for Valentine's Day! Sorry, it's taken me so long to post. I've been having Internet issues and was out of town yesterday (I got to shop in the city!!!) After a 40 minute phone call, I got my Internet issues resolved! Yea!

Peanut Butter Balls

Ingredients

2 cups creamy peanut butter
1 stick of butter, softened
1 16 oz package of powdered sugar
2 1/2 - 3 cups Rice Krispie cereal (use as much depending on how crispy you want them)
approximately one bag of chocolate chips
Shortening (optional)

Directions:

Mix peanut butter and butter until smooth. Gradually add in powdered sugar. Once it is light and fluffy, pour in cereal and mix well.

Roll into balls using your hands and place on a parchment paper lined cookie sheet. I used my cookie scoop and it made this go much quicker! If you choose, you can stick sucker sticks in. I normally don't mess with this step. Chill for 30 minutes.

Extra Step for using sucker sticks! Melt chocolate however you choose, stirring frequently. I add a tablespoon or so of shortening to my chocolate. Remove each sucker stick and dip the tip in chocolate and the reinsert it into the ball. Chill again to harden the chocolate. This helps keep the balls from falling off the stick.

Melt chocolate (or remelt if you did the above step). I add a tablespoon or so of shortening to my chocolate. Dip the balls into the chocolate. Skewers and toothpicks can be helpful for this step. Place balls back on lined cookie sheet. Sprinkle with goodies and chill until hardened. I store this in an airtight container in the refrigerator.


Your Valentine will love you FOREVER if you make these!!!!!!!!!

Friday, February 6, 2009

Chocolate Crinkle Cookies

These are little pieces of chocolate gold - seriously! I actually mixed the dough up the night before and it worked perfectly since the dough is supposed to be chilled. These taste a bit like a brownie cookie covered in yummy powdered sugar!

Chocolate Crinkle Cookies

1 cup unsweetened cocoa powder
2 cups sugar
1/2 cup vegetable oil
4 eggs
2 teaspoons vanilla extract
2 cups all-purpose flour
2 teaspoons baking powder
1/2 teaspoon salt
1/2 cup powdered sugar

In a medium bowl, mix together cocoa, sugar and vegetable oil. Beat in eggs one at a time, then stir in the vanilla. Combine the flour, baking powder, and salt; stir into the cocoa mixture. Cover dough and place in freezer for 30 minutes or chill in refrigerator for 4 hours.

Preheat oven to 350 degrees. Spray cookie sheets with nonstick spray. Use a cookie scoop to scoop dough into one inch balls. Coat each ball with powdered sugar before placing onto prepared cookie sheets.

Bake in preheated oven for 10-12 minutes. Let stand on the cookie sheet for a minute before transferring to wire racks to cool.
Enjoy, enjoy, enjoy! And hide some.

Thursday, February 5, 2009

Bacon Cheeseburger Chili Mac & Cheese

I ran across this recipe somewhere in blogland - I'm not sure where. It is adapted from a Rachael Ray recipe. I enjoyed it, but the hubby told me it tastes like Hamburger Helper. Thanks, hon! Anyway, I've never had hamburger helper, but I have to say this has to be better. :)

Bacon Cheeseburger Chili Mac and Cheese

Ingredients:
6 slices of bacon (cut up)
1 lb ground beef
1 onion, finely chopped
2 T chili powder
2 T garlic powder
Salt and freshly ground pepper
1/2 cup ketchup
1/4 cup yellow mustard
1-2 cups beef stock (I used a can of chicken stock)
1 lb whole wheat pasta
1 1/2 cups shredded sharp yellow cheddar (I used colby jack)

Directions:
Pre-heat oven to 400 degrees. Bring a large pot of water to a boil.

Cook bacon in a large skillet until crisp. Drain off most of the grease, leaving about 1/2 tsp or so. Add meat and onion and cook until browned. Drain grease.

Return meat to skillet. Add the chili powder, garlic powder, salt and pepper. Stir in ketchup, mustard and beef stock. Bring to a bubble and simmer until slightly thickened, 4-5 minutes.

Salt the boiling water and add pasta. Cook to al dente, according to directions on the package. Drain thoroughly and return it to the pot.

Add the chili mixture and the bacon to the pot with pasta. Mix everything good. Transfer to a casserole dish and top with shredded cheese. Bake 25 minutes until cheese is melted and golden brown.

Monday, February 2, 2009

Pepperoni & Cheese Stuffed Chicken

I ran across this recipe here. I can't find the direct link, but you might check out this cooking blog - she always has great recipes.
This was the 2nd time I've made this chicken recipe - I've posted it on my personal blog before without the pictures.
Pepperoni & Cheese Stuffed Chicken

Ingredients:

Boneless Skinless Chicken Breasts
Sliced Pepperoni
Cheese
Extra Virgin Olive Oil
Italian Seasoning (I didn't have Italian seasoning so I used rosemary, oregano, & thyme)
Salt & Pepper
Toothpicks


Directions:
Between wax paper pound out the chicken breasts until thin. Layer the sliced pepperoni- however much you would like. Layer the cheese (I used mozzarella this time but have used provolone before) - however much you would like.

Roll the chicken up and secure it with toothpicks, seam-side down (I forgot to do this!).Place in oven safe dish- drizzle with EVOO and sprinkle with S&P and Italian Season to your liking.

Bake on 325 for about 30 minutes or until done

I am thinking a pesto-marinara dipping sauce would go great with this. Rachael Ray made one that I've been meaning to try. You can find it here.

Saturday, January 31, 2009

A fun way to roll - Nacho Pinwheels

I know it's a little late but this would make a great Super Bowl finger food. It's pretty quick & easy to make too.

I tried this recipe I found on the Betty Crocker website for some pinwheel type rolls. They are meant to be a Mexican side dish, but I think they are something that could be made for many different purposes. I made them to go along with a chicken dish tonight and we ate them without the salsa & sour cream. This is a versatile recipe - you could roll just about anything in it! I'm planning on making pepperoni pinwheels next time. I actually halved this recipe tonight and it made plenty for our family of 3!
Nacho Pinwheels adapted from Betty Crocker

Ingredients:
3 cups Bisquick mix
3/4 teaspoon chili powder
(I also added some garlic powder)
1/2 teaspoon dried oregano leaves
2/3 cup water (I used half milk)
2 tablespoons butter or margarine, melted
1 cup shredded Cheddar cheese


Heat oven to 425. Grease cookie pan with spray or shortening. In a large bowl, stir Bisquick mix, chili powder, oregano, garlic and water until soft dough forms. (may need to add extra water to get the dough the right consistency) Place dough on surface sprinkled with Bisquick mix or flour. Gently roll to coat and shape into ball. Knead 10 times.

Roll dough into 18x10 rectangle (be sure to use your tape rule! :)) Brush butter over dough. Sprinkle with cheese. Roll up rectange tightly, beginning with the long side. Pinch edge to seal. Cut in to 1" slices. Place on cookie sheet.
Bake 11-13 minutes or until golden brown. Serve warm with salsa and sour cream.

Tuesday, January 20, 2009

South of the Border Casserole

This is a recipe I ran across today when looking for a new recipe for ground beef. I found it on Delicious Meliscious. It was so easy and delicious! Everyone gave it the thumbs up... I'll be adding this to my recipe book to use again! I totally meant to take pictures of the casserole and forgot! We were in such a hurry to eat this up!

South of the Border Casserole

Ingredients
1 pound of lean ground beef (I used 3/4 beef, 1/4 pork sausage)
1 mild jalapeno, chopped
1 bell pepper, chopped
3 cloves of garlic, minced
28 oz can tomatoes (I used two 14.5 oz cans - both were crushed tomatoes and one had peppers in it)
2 tablespoons chili powder
2 tablespoons cumin
2 cups fat free sour cream
8 oz. penne, ziti or any small pasta (I used whole wheat penne & elbows)
1 cup cheddar cheese (I used low fat mexian cheese)
1/4 cup cilantro, minced (I left this out)

Directions
In a deep skillet, brown meat, drain fat, if neccessary. Add the peppers, onion and garlic, and cook on medium-high heat. Saute until softened, about 8-10 minutes. Add chili powder and cumin.

Add the can of tomatoes, breaking up the whole tomatoes with a spoon, but sitll leaving big chunks. Add sour cream, stir until mixed. Add pasta. Cover and cook until pasta is al dente, about 25 minutes. Make sure to stir frequently so pasta doesn't get stuck to the bottom. Serve with the cheese and cilantro sprinkled on top. Serve immediately.