Showing posts with label Kids. Show all posts

Thursday, May 19, 2011

Applique Onesie - again!


I realize I've posted monogrammed onesies before - but wanted to share this one real quick. I'm crazy in love with the turquoise & bright yellow combo! I made Miss T a dress using this combo recently too. The yellow is actually a pillow sham I picked up at a Crate & Barrel outlet. I love re-purposing fabric finds!

Happy Birthday Miss K! I bet you'll look oh.so.cool in your summer monogram shirt! 

Wednesday, May 18, 2011

Bling it Out!


A friend recently asked me to try to girlify this baseball shirt for some fun family photos - the kids (all 4 of them!) are going to dress in their Red Sox gear. My dear sister will be shooting the photos to boot! 


I thought it was cute how just some bling and a bow takes a boyish shirt to all girly! I know Miss G will rock this shirt at her fun photo shoot! 

Sunday, December 26, 2010

Handmade Boy Gift: Car Cozy

I was inspired to make this car cozy for Cayson for Christmas after seeing it on Crafting Chicks. It’s hard to come up with handmade things for rowdy boys! I ended up making two – one for Cayson and one for a friend of his.

IMG_6709

I used a chambray type fabric for the inside and yellow ric rac to mark the “street.”

IMG_6710 IMG_6711

Tuesday, December 14, 2010

Beyond Delayed Post: Another Turkey Shirt

I realized I didn’t post about this turkey shirt for Miss Priss… I love how it turned out! My stitching was terrible because I later realized I had my walking foot on… oops.

IMG_6160 IMG_6162 IMG_6186

You can view the other turkey shirt I made here.

Sunday, November 21, 2010

Turkey Shirt

Are you ready for Thanksgiving??? I’m far from it! I still need to hit the grocery store to get supplies for my cooking & baking! I did make this shirt for a pint sized friend! Miss T has one similar – just different fabric… I haven’t finished hers yet though! It will happen before Thursday though…

IMG_6155 IMG_6152

Monday, November 15, 2010

Stylish Christmas Bibs

 IMG_6066

I appliquéd a few bibs for Christmas while I was working on projects. Makes for festive dining for little ones!!!

IMG_6068 IMG_6069

Saturday, November 13, 2010

Soft Cuddly Blankets

IMG_6078

I made a couple of minky type blankets for the kids using this tutorial. I used my walking foot for this project and it helped a lot! Definitely use it if you have one. This was my first time using a walking foot – it sounded intimidating but it was actually simple.

I made Miss T’s blanket first and her brother requested one – as in, identical and pink! I made this baseball one today for him. I think he was a little disappointed at first that it wasn’t pink but he quickly got over it and hasn’t let it out of his sight! 

IMG_6075 IMG_6076 IMG_6077

Wednesday, November 10, 2010

Appliquéd Birthday Shirts

I’ve made a few birthday shirts for some dear friends…. well, my dear friends’ kids. I thought I’d share real quickly. I added some jewels to the crown on the princess one – the bling around the neck was on the shirt to begin with.

 IMG_5799 IMG_5802

How about a tractor for a sweet 3 year old’s birthday? The poor picture is courtesy of my phone.

IMG_1024

Tuesday, November 9, 2010

Christmas Projects: Pajama Pants, Scrappy Appliquéd Christmas Onesies

I am constantly working on projects around this place but rarely get the time to blog them… much less tutorials on them. Sorry for the lack of posts!

I had the “genius” idea to make matching Christmas lounge pants for our family. I bought this flannel fabric at Joann’s a month or so ago and just now got around to making the kids’ pants. I used existing pants as my pattern for them. Note: Do not use stretch leggings as a pattern… not that I would know but the pants will turn out entirely too small especially since flannel has no stretch. Not that I did this, or anything.

IMG_6021

Cayson was thrilled with his pants and broke them in the first night! Hubby wants me to appliqué a Christmas tree to his shirt so I need to get that added.

IMG_5995 

Taryn’s pants got some ric rac trim… I think I might add a ribbon bow to the top too.

IMG_6013 IMG_6015 IMG_6016 

I also made these scrappy Christmas onesies for Taryn along with a matching bow.

IMG_6022  IMG_6024 IMG_6025  IMG_6028 IMG_6026

I have plans for some in red/greens too! I might offer a few for sale in the next week or two.

Saturday, October 16, 2010

Princess Appliqué Bib

IMG_5412

I whipped up this bib for a special little girl’s first birthday party! Her birthday was a princess birthday to celebrate this darling’s miraculous first year!

For the bib, I made the crown appliqué and added some jewels for a little bling-bling!

IMG_5574

Hopefully, it did it’s job! Wish I got a picture of the aftermath. Happy Birthday, Gracelyn! 

Tuesday, September 21, 2010

Monogrammed Onesies and other Baby Projects

I was a little sewing happy last week which was great fun! I had a custom order for a tractor onesie and a J monogrammed onesie with matching bow. I loved the ruffled monogram so much that I made one for Taryn to match her tutu skirt. I love how it turned out!

IMG_9187 IMG_9190

 IMG_9122 IMG_9125 IMG_9128

We also welcomed a new nephew into this world last week so I made a couple of burp cloths and a monogrammed onesie…. except in all my concentration with two pint sized distractions, I made a BIG mistake!

IMG_9148

It was quickly fixed once the pint sized distractions went to bed….

IMG_9160

Tuesday, May 25, 2010

Home Run Bean Bag Toss

Hosting provided by FotoTime

For Cayson’s baseball birthday party, I envisioned a bean bag toss board. Something simple. I asked my husband to look for a board that would work… with very vague size descriptions… not too big and not too small, just right. :) He ‘loves’ those kind of descriptions.

He found me a board that he trimmed just a bit… it was a scrap so no purchase necessary. He & Cayson painted it white for me… we used a wall paint we had and it pretty much was used like a primer. I pretty much just eye-balled it and taped a diamond out with masking tape before painting the whole board green (the cheapest quart of paint at Walmart that we could find – we had mixed). Due to the cheapness of the paint, it took several coats of green. I added the dirt aka brown paint. Once that dried, I peeled the tape up to reveal the striped baseline.

Hosting provided by FotoTime

Sweet hubby cut out the holes at each base using his jig saw and I added the title – obviously free-hand.

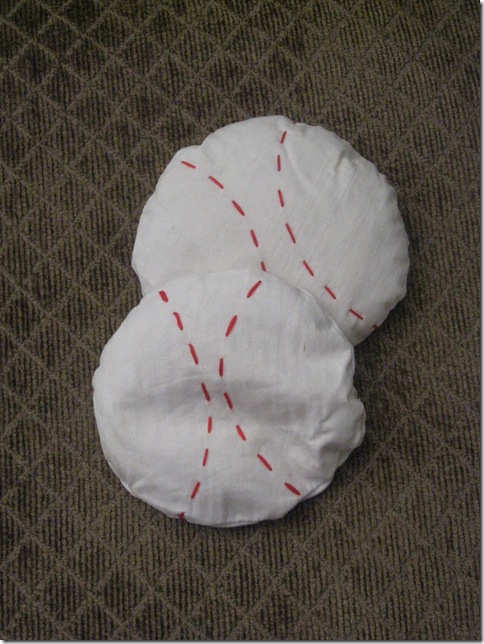
I sewed these baseball beanbags for the game.
IMG_7908

All in all, it was a fun project and we plan on using the board for our church’s Trunk or Treat. I can always paint something on the other side to re-use it for another party or paint over the baseball side.

Hosting provided by FotoTime

The total cost was $10 for the paint (green mixed quart & brown craft paint) plus maybe $1 for the white muslin fabric for the beanbags. We had everything else.Hosting provided by FotoTime

Visit thecsiproject.com

Wednesday, March 31, 2010

Easy Paper Art

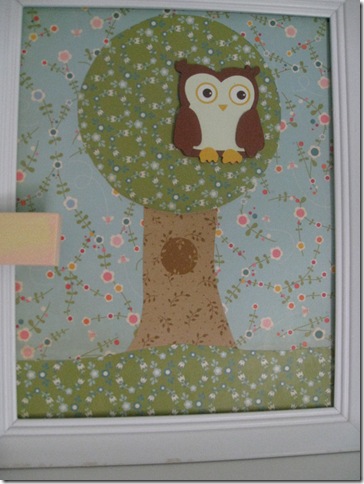
I made this little piece of “art” that is currently on display above Miss Priss’ crib. I painted an old frame white… which was actually the most complicated thing EVER! This frame was an old cheapie from Wally World – still had the ancient price sticker on it. The red from the wood BLED through like crazy. Hubby finally took it out and shot it with Kilz and that did the trick. It was crazy- I’ve never had that issue. Anyway…. moving on…

IMG_7341

I free-handed the design using coordinating scrapbook papers. I did use a bowl as the template for the tree top. I glued it all together and added the owl that coordinates with her bedding.

BrookeQuilt

I did do a layer of Mod Podge over the finished product. 

IMG_7340

The T was an unfinished chipboard letter I bought at Hob Lob. I painted it pale yellow and then rubbed a light pink over it with a rag.